Wednesday, March 20, 2013

Mondrian Masterpieces

So I taught two days of intercession this week....and now my Spring Break can FINALLY begin! But, honestly, to anyone interested in teaching intercession, it was totally fine. The day flew by...it was only from 8:00am - Noon....

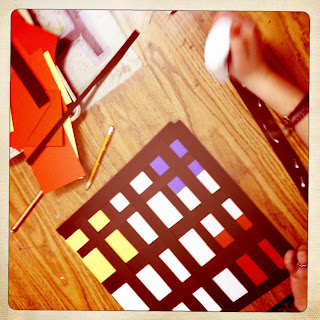
I taught the last hour from 11:00 - 12:00 and we did "Groovy Math and Art"...so we did this Mondrian project. I taught this to 3rd grade and 4th grade.

I started by introducing Mondrian with some of his paintings. I put together a quick PPT and had the kids compare and contrast his "Composition II with Red, Blue and Yellow" against "Broadway Boogie Woogie".
                          
"Broadway Boogie Woogie", 1942-43 vs. "Composition II in Red, Blue and Yellow" 1930

*I borrowed these images from various online sources.

We discussed how Mondrian's style changed over time and we looked at "The Red Tree" vs. "The Gray Tree" ....seeing how he abstracts the tree over time...simplifying lines, shapes and colors.

  
"The Red Tree" ,      1910                                "The Gray Tree" , 1911


"Composition No.10 Pier and Ocean" 1915

Click to view full-sized image
"Composition No. II; Composition in Line and Color" 1913

This is a nifty website with a lot of his paintings, in chronological order...
http://www.wikipaintings.org/en/piet-mondrian

The Project
The kids created a simple collage using one red, one yellow and one blue (pre-cut) shape. Then they added at least 3 black lines to break up their composition...and the math portion of this was to calculate the area of each primary color shape and white spaces if they had time. We measured with rulers and found the length and width in centimeters.

Overall, I think the kids enjoyed learned about Mondrian....their art always looks good and they understood how to find the area pretty well. Success!


I typed up these sheets for their data...made it easy for them to just plug in the numbers. 


Monday, March 18, 2013

Kindergarten Textures/Eric Carle Inspired Animals

Eric Carle Inspired: Hot Dogs and Cool Cats
Tissue Paper Collage...Warm and Cool Colors
 
I got this idea from my cooperating teacher (when I did student teaching)...
 
We drew a dog head on one side of our paper and a cat head on the back. They chose their favorite image and outlined in black sharpie.

We titled the drawings either "hot dog" or "cool cat" ....

Then we grabbed a handful of either cool color tissue paper squares or warm colors...I had precut two gallon bags of these....I might do a "warm table" and a "cool table" in the future to prevent confusion.

I had little cups of watered down Mod-Podge on their tables with brushes...
 
Texture Collections
 
We folded our 9"x12" paper 3 times to get 8 blocks. We started "capturing" textures one at a time, I would demo how to do a texture rubbing in one block, they would echo at their table and come back for the next step.

After they captured 4 correctly, I just let them do the rest on their own. The objectives were to capture 8 different textures, with 8 different colors...no white space!

I dumped a handful of texture plates on each table...they could trade with other tables...


After we filled the page, we painted over our textures with Tempera Cakes....I'll have to post those pics later.


Sunday, March 17, 2013

Picasso Heads with 2nd Grade


These are the beginnings to some really fun Picasso Heads...by 2nd grade

We talked about Picasso, watched the BrainPopJr. video on him: http://www.brainpopjr.com/artsandtechnology/art/pablopicasso/preview.weml


They began by drawing a cubistic head...outlined in black marker and we are coloring them with brand new crayons...(last day project before spring break)
I did an art challenge of coloring one side of the face with cool colors aka Blue Period colors...and the other half of the face with warm colors aka Rose Period colors. (by the way, a very smart kid gave me the Blue vs. Rose Period idea...I just had warm vs. cool....isn't it great when they teach you?)

But they are looking so fun, that we'll put one more day into them when we get back...I'm thinking cutting the heads out and putting them on bright construction paper? or possibly just painting the background...we'll see...I'll post pics after spring break! Woo.


Day Two: Finishing Coloring and Collaging to Background Paper


2nd Grade Paper Mask Sculpture

This is an annual project for my 2nd graders. It's always a big hit and I love the results.
 
Day One: Cutting the shape of the mask from a folded piece of 9"x18" construction paper. I model a "sunset" shape along the folded edge to create an oval.
 
 
We also cut the chin and make it 3-D like this:


Sorry this is sideways but I've already tried three times to fix it and it's not moving. :(


Day Two: Adding the eyes, eyelashes, eyebrows and mouth...


I did a three layer color requirement for the eyes. We discussed contrasting colors...

 
Day Three: Hair!
 
I demonstrated these five paper scuplture techniques for hair...


Sunday, March 10, 2013

Collagraph Prints with 3rd Grade


It's printmaking time in 3rd grade and I chose to do this collagraph fish project again because last year's results were great! And I am impressed with this year's batch of fish too!

Day One: Cut out the fish...start building up layers.


Day Two: Building up lots more layers! Big shapes, medium shapes to small shapes. I got out the paper edger scissors and the hole punchers out for this day.


Day Three: Printing the Collagraphs

I set up one table with paper and brayers/trays. I did 4 different colors and in every color but black I mixed two inks together. It gives the prints an interesting effect...sometimes hombre if the kids are careful not to over mix it.


Side Project: Dr.Seuss style fish...painted underwater scene...


Oil pastel and tempera paint...these were fun for a one day lesson during Read Me Week