Saturday, February 16, 2013

Kindergarten Monsters....

I did this project last year and the kids really liked it, it was pretty cheap to make and the results are just so fun.

We did this in 2 days (2 one hour classes) and these are going in the art show again this year too!

Day One: Attaching the Monster to the base and Painting!
Teacher Prep: Cut down cardboard tubes to about 5 inches high...and cut little 1/2 inch slits in the bottom of each tube. Also cut a cardboard box into 3"x3" squares or bigger for the sculpture base.


We 'peeled' back the little tabs at the bottom that I pre-cut and glued them to the base with tacky glue.
The kids pressed down the top of the tub to create "ears" for their monster.

We also had a little color theory review since they had blue, yellow and white paint...they could mix as they pleased and some remember that they could make green. How quickly we forget.

They bring them to me when they are done painting ALL THE BROWN SPACE! Except for the bottom where I have written their name and class code. We talked briefly about good craftsmanship.
 
 
DAY TWO: Adding facial features to our monster!
Embellishments!


 I wanted them to create at least 2 layers of contrasting colors for the eyes...so we did that first and then I let them choose googly eyes.
Also we cut out the mouth and added teeth with oil pastels before we glued on...I learned that the hard way with the first class.


We added paper sculpture techniques to create grass, water or fire for our monster's environment.


Of course I had to get the feathers out and they could pick 2 feathers for either hair, wings or a tail.
 
The arms are pipe cleaners and showed them some wire bending/twisting techniques and I used an awl to poke holes in the sides of the tube for the pipe cleaners.
 

How to Make a Clay Animal

About 7 minutes long...good techniques...without having to make attachments
 
Here's one with how to do attachments but it's sped up,so you'd have to explain score/slip and blending...
 
 
4th Grade Fantasy Animals
Drawing Dragons....getting ready for "Fantasy" Unit


Day Two: Building Clay Animal


Day Three: Painting the Clay Animals


Day Four: Building a Habitat for the Animal


Some photos of Clay Animal Project Ideas:


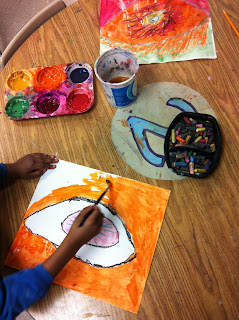
Alien Eyes with 1st grade

I borrowed this lesson from Mr.E ...here's the link: http://artwithmre.blogspot.com/2011/03/alien-eyes-4th-grade.html

We drew large eyes in pencil first then outlined with oil pastels and painted with tempera cakes.

This project wrapped up our "Outerspace Unit" ...and the kids really enjoyed this.


Clay-Aliens

Here is my 1st grade clay project this year. We are supposed to do pinch pots but this group of 1st graders are up for challenges so we did Aliens!

We did this in one hour and I am really happy with the results. I'm going to put them in the art show and I wanted to glaze them, but alas time is running out! So we are going to paint them acrylics or tempera paint...probably tempera.

We made a pinch pot and turned it upside down then added eyes, antennas...


I'll post more pics later once these are painted.

Art History in a Hurry ~ Mona Lisa Video


Big Bird with Chuck Close Video


Winter Birds and Cups o' Hot Cocoa! (1st grade)

We used this deepspacesparkle lesson for our birds:


I loved adding the little nests with eggs!
 
 
-----------Hot Cocoa-------------
And this was right before xmas break....we made these cups of hot cocoa/chocolate/tea/coffee...
They drew them in oil pastels and then painted with tempera cakes.
 
I downsized the scale to 9x12 for the next classes which seemed more managable for the hour long class period.